School Instructions
- Click on the Add a New Student tab.
- Enter the First, Middle, and Last Name – of your new student. The Legal Name field will populate automatically. See demo.
- Do NOT use all capitals. Be sure the spelling is accurate.
- Be sure the name matches the student’s government issued documents.
- Passport
- Birth Certificate
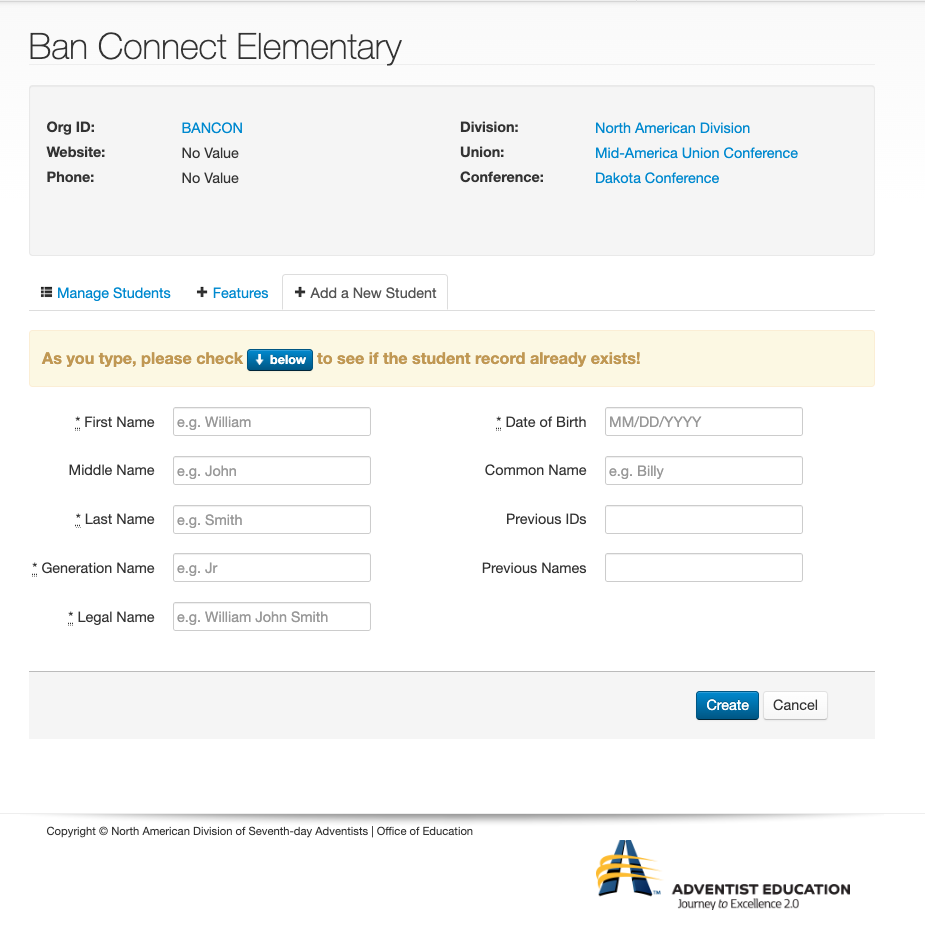
- SEARCH FIRST — regardless if this is a brand new and/or young student or not.
- As you type, search the list of “similar students” below the data entry fields.
- IF you find the student’s name — verify the birth date with your student’s legal record.
- If you see a name with what could be your student’s name, but is misspelled — and with the same birth date — consider that it could be your student with a misspelled name. If the birth date is off by one or two days, it could also be your student. You can transfer that student to your school and then edit the spelling or birth date. You must be VERY sure when making these edits. Be sure to check the school history to be sure that this is the same student.
- Click on the Enroll button to enroll the student in your school.
- If the student is NOT in the list, proceed to create a new Student ID number.
- Be sure you have entered the first, middle, and last names in the Legal Name field.
- Do not abbreviate and do not use all capital letters.
- Press TAB three times to auto-fill the next three name fields.
- Enter the student’s full birth date.
- If the student has a nick name or other name they prefer to be called, enter it in the Preferred Name field. (Do not repeat the first name in that field. This field is only if the student prefers being called by the middle name or a nick name.)
- If you come across a student with two or more NAD ID numbers, research to find the number that was used in the most recent standardized testing. Contact your conference to facilitate merging the ID numbers. The student ID will be cross-referenced with the other number archived.
- If the student has been adopted, or had a last name otherwise legally changed, enter the previous last name in the Previous Name field.
- Check AGAIN — one more time — in the Similar Student list to be sure the student is not there.
- IF they are not listed — check the box to verify that you have searched and checked for the student in the list of Similar Students.
- Press Create to create the Student ID.
- The new student should appear at the bottom in the “This Year’s Student.” The student will be sorted correctly (ABC order) when you refresh your browser’s screen.
- If Student Pending appears beside the student’s name, there is a problem with your attempt to create a new Student ID. Do NOT try to create the student again. Do NOT make up any information to try to side-step this process. It is VITAL that this information is accurate. The ID will be reconciled within 24 hours (excluding Sabbath.)
- The ID manager of the school will receive a system-generated email alerting that the Student ID process is pending. Another system-generated email will be sent when the ID number is released. Do NOT reply to those emails.
- If there is an attempt to create a duplicate ID for a student already in the system, the pending ID will be deleted. If you believe this was deleted in error, contact your conference to facilitate the approval.
- Students are able to be “dual-enrolled.” For example, this would occur if a student is in 8th grade and taking Algebra I at the academy.
Conferences: Contact Martha Ban for ID assistance.
Do NOT make up birth dates, ID numbers, or any other information regarding Student IDs.
Student ID numbers may NOT be held for financial reasons.
If you have questions regarding the administrative hold process, please contact your conference.